In the world of technology, sometimes a fresh start is the best solution, especially if your computer has been acting sluggish, experiencing software issues, or you plan to sell or give it away. One way to ensure your system is as good as new is to reset it to its factory settings. But how to reset computer to factory settings Windows 10? This is a common question that many users ask, and for good reason—it’s an effective method to return your computer to its original state, without unnecessary bloat or issues.
In this guide, we’ll walk you through the process of how to reset computer to factory settings Windows 10, explain why you might want to do so, and what precautions you should take before resetting. So, let’s dive into everything you need to know.
Why Should You Reset Your Computer to Factory Settings?
Before jumping into the how-to, it’s important to understand why you might want to reset your Windows 10 computer to its factory settings. Here are a few reasons:
- Performance Issues: Over time, your computer may slow down due to software clutter, unused applications, or malware. Resetting the system can help improve speed and performance.
- Troubleshooting: If your PC is encountering serious issues like crashing or errors that aren’t resolved by normal troubleshooting methods, a factory reset could be the solution.
- Selling or Giving Away Your Computer: If you plan to sell or give away your computer, resetting it to factory settings ensures that all your personal data is removed from the device, protecting your privacy.
- System Recovery: A reset can restore your system to its default state, essentially starting from scratch, without needing to reinstall Windows manually.
Now that you know why resetting your computer to factory settings is useful, let’s look at the steps you need to follow.
How to Reset Computer to Factory Settings Windows 10
Windows 10 offers a built-in feature that allows you to reset your system to its factory settings with ease. Here’s how to reset computer to factory settings Windows 10 using the “Reset This PC” option.
Step 1: Backup Your Important Data
Before you begin the reset process, it’s essential to back up your files. Resetting your computer will erase everything on the system drive (typically C:), including your apps, settings, and personal files.
Here’s how you can back up your data:
- Use an External Hard Drive or USB Flash Drive: Transfer your important files such as documents, photos, music, and videos.
- Cloud Storage: Upload files to cloud services like Google Drive, OneDrive, or Dropbox for easy access after the reset.
- Create a System Image: If you want to restore your current setup after the reset, you can create a system image using Windows’ backup feature.
Step 2: Open Settings
Once your data is safely backed up, follow these steps to reset your computer:
- Click on the Start button (Windows logo) in the lower-left corner of your screen.
- Select the Settings (gear icon) to open the Settings menu.
Step 3: Navigate to Update & Security
In the Settings window:
- Click on Update & Security.
- On the left-hand panel, click on Recovery.
Step 4: Select Reset This PC
In the Recovery section, you will see a “Reset this PC” option. This is where you can begin the reset process. Click on the Get Started button under this section.
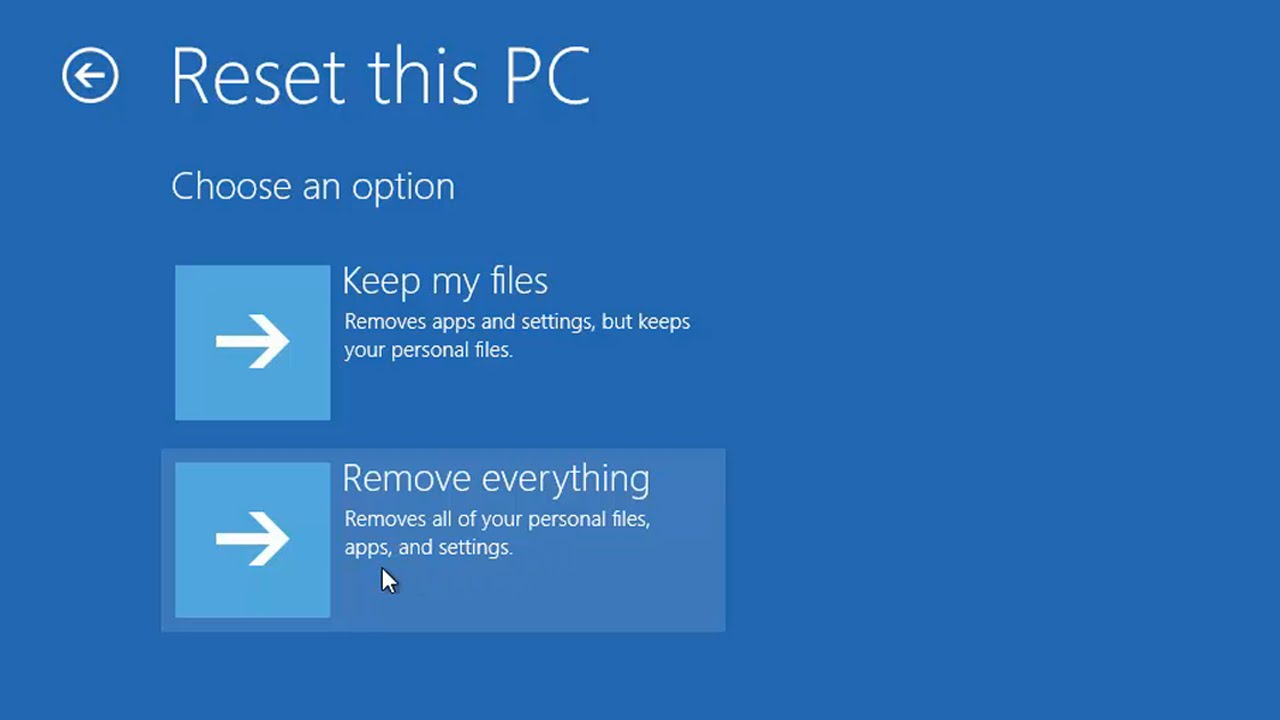
Step 5: Choose an Option
You will now be presented with two options:
- Keep My Files: This option will remove your installed apps and settings but will keep your personal files, such as documents and pictures. This is ideal if you’re looking to refresh your system but don’t want to lose your data.
- Remove Everything: This option will remove all your personal files, apps, and settings. Choose this option if you want a complete factory reset. If you’re preparing to sell or give away your computer, or if you want to start fresh with a clean slate, this is the best option.
Step 6: Additional Settings (Optional)
If you chose the “Remove Everything” option, you will be asked whether you want to:
- Just Remove My Files: This is a quicker option but may not be as secure. It will delete your files but might leave some data behind that could be recovered by advanced users.
- Remove Files and Clean the Drive: This option will take longer, but it’s more secure. It will clean your drive, making it harder for someone to recover your personal data.
Step 7: Begin the Reset
Once you’ve selected your preferred options, click Next, and then confirm your decision. You will be shown a summary of what will be removed from your computer. If everything looks good, click Reset to begin the process.
The reset process will take some time, and your computer will restart several times. Depending on the speed of your device and the options you selected, it can take anywhere from 30 minutes to a few hours to complete.
Once the process is finished, your computer will boot up as if it were brand new, with the original factory settings restored.
What Happens After You Reset Your Computer to Factory Settings?
After the reset, your Windows 10 PC will be in its original state. Here’s what you can expect:
- Windows 10 Setup: You’ll be prompted to go through the initial setup process, similar to when you first bought the computer. This includes selecting your region, language, signing in with a Microsoft account, and setting up a password.
- Reinstalling Applications: Any apps or programs you installed will be removed. You’ll need to reinstall any applications you use regularly, such as your web browser, productivity tools, and media players.
- Personal Data: If you chose the “Remove Everything” option, all your personal data (photos, documents, etc.) will be wiped out, so make sure you’ve backed up your important files before starting the reset.
- System Updates: After the reset, your computer may need to download and install the latest Windows updates, so make sure you have an active internet connection.
Additional Methods to Reset Your Computer to Factory Settings Windows 10
If you’re unable to access the Settings menu, there are alternative ways to reset your computer:
Method 1: Using Advanced Startup Options
- Restart Your Computer: Press and hold the Shift key while selecting Restart from the Start menu.
- Select Troubleshoot: Once your computer restarts, you’ll be presented with the Choose an option screen. Select Troubleshoot, then Reset this PC.
- Choose an Option: Follow the steps as mentioned earlier to select whether you want to keep your files or remove everything.
Method 2: Using Installation Media
If your computer is unresponsive and you can’t access the recovery options, you can use a bootable USB drive or DVD with Windows 10 installation media to reset the system. Simply boot from the installation media and choose the option to reset the PC.
Precautions to Take Before Resetting Your Computer
- Backup Everything: As mentioned earlier, ensure all your important files are backed up. Once the reset begins, you won’t be able to recover any lost data.
- Have Power Supply Ready: If you’re on a laptop, plug it into a power source to prevent the computer from turning off during the reset process.
- Know Your Software Keys: If you’re reinstalling paid software, make sure you have the activation keys and installation files saved before starting the reset.
Conclusion
Knowing how to reset computer to factory settings Windows 10 can be a lifesaver in situations where your computer needs a fresh start. Whether you’re looking to fix performance issues, clean up your device before selling it, or resolve system errors, resetting your PC to its factory settings is a great way to restore your system to its original state.
Just make sure to back up all your important files and data before proceeding, and remember that a factory reset will erase everything on your computer. Follow the step-by-step guide, and you’ll have your PC running like new again in no time.