
Is your computer running slow, fans whirring loudly, and applications freezing? High CPU usage in Windows Task Manager is a common culprit. When a program or process demands an excessive amount of your Central Processing Unit (CPU), it can bring your entire system to a crawl. This comprehensive guide will walk you through various steps to diagnose and fix high CPU usage, helping you get your PC back to optimal performance.
Understanding High CPU Usage
Before diving into solutions, let’s understand what high CPU usage signifies. Your CPU is the “brain” of your computer, responsible for executing instructions and processing data. When a process consumes a large percentage of your CPU’s capacity, it means that process is actively using a significant portion of the processor’s resources, leaving less for other tasks. This can lead to sluggish performance, unresponsiveness, and even system crashes.
How to Check CPU Usage in Task Manager
The first step is always to identify which process is causing the problem.
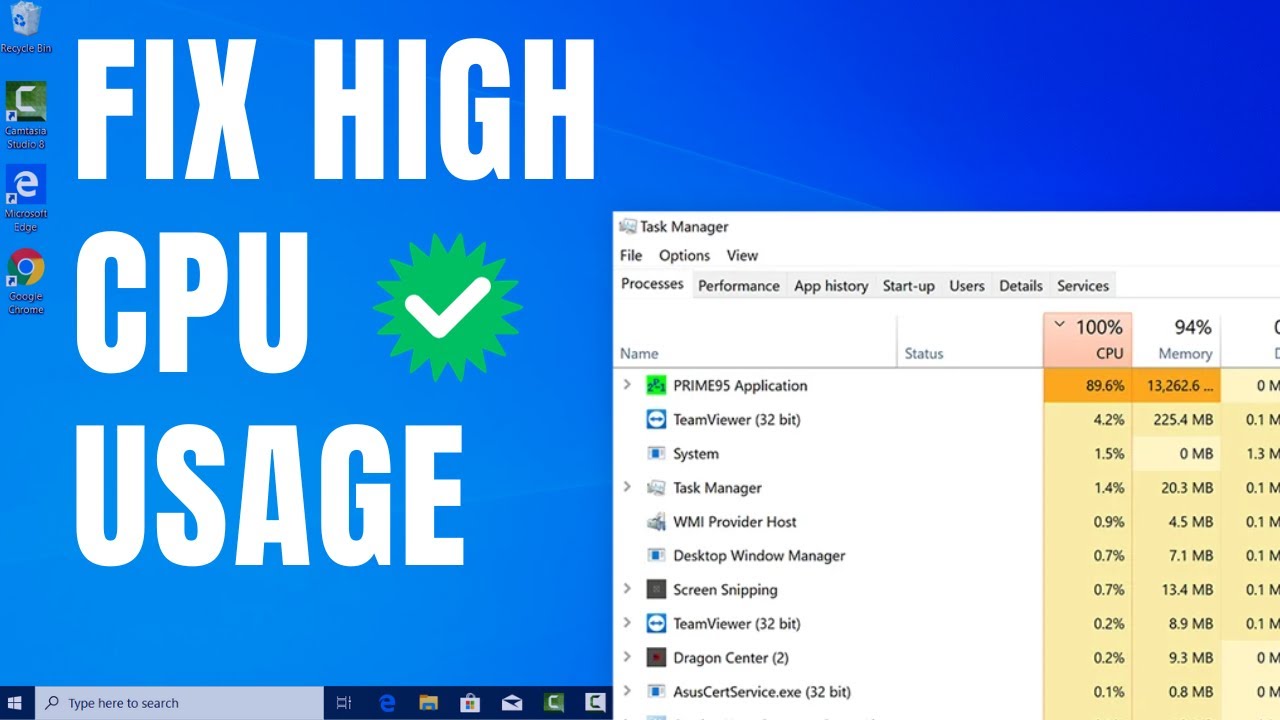
- Open Task Manager: Press Ctrl + Shift + Esc simultaneously, or right-click on the taskbar and select “Task Manager.”
- Go to the Processes Tab: By default, Task Manager opens to the “Processes” tab.
- Sort by CPU: Click on the “CPU” column header to sort processes by their CPU usage. The process at the top is currently using the most CPU.
Once you’ve identified the culprit, you can begin troubleshooting.
Solutions to Fix High CPU Usage
Here’s a step-by-step guide to addressing high CPU usage:
- End Unnecessary Processes
Often, high CPU usage is caused by a runaway application or a background process that’s not essential.
- Identify: In Task Manager, look for processes consuming a high percentage of CPU. If it’s an application you recognize and don’t need running, proceed to the next step.
- End Task: Select the process and click “End task” at the bottom right of the Task Manager window. Be cautious when ending unfamiliar processes; some are critical for Windows to function. If unsure, search for the process name online before ending it.
- Restart Your Computer
This is a classic for a reason. A simple restart can resolve temporary glitches and clear out processes that might be stuck or consuming excessive resources. It’s often the quickest fix.
- Update Drivers
Outdated or corrupted drivers can sometimes lead to high CPU usage, especially for components like graphics cards, network adapters, or chipsets.
- Device Manager: Press Windows key + X and select “Device Manager.”
- Update Drivers: Expand categories (e.g., “Display adapters,” “Network adapters”), right-click on your device, and select “Update driver.” Choose “Search automatically for drivers.”
- Manufacturer’s Website: For critical drivers like graphics cards, it’s often best to download the latest drivers directly from the manufacturer’s website (e.g., NVIDIA, AMD, Intel).
- Scan for Malware and Viruses
Malware or viruses can secretly run in the background, consuming significant CPU resources.
- Antivirus Software: Run a full system scan using your preferred antivirus software (e.g., Windows Defender, Avast, Malwarebytes).
- Adware/Spyware Scan: Consider using a dedicated anti-malware tool to check for adware or spyware, which can also cause performance issues.
- Adjust Power Options
Incorrect power settings can sometimes lead to the CPU running at full speed unnecessarily.
- Power & Sleep Settings: Go to Settings > System > Power & sleep.
- Additional Power Settings: Click “Additional power settings” under “Related settings.”
- Change Plan Settings: Select “Change plan settings” for your active power plan.
- Change Advanced Power Settings: Click “Change advanced power settings.”
- Processor Power Management: Expand “Processor power management” and then “Maximum processor state.” Ensure it’s not set to 100% on battery or plugged in if you’re experiencing high CPU usage without heavy tasks. Try reducing it slightly (e.g., to 95% or 90%) and observe.
- Disable Startup Programs
Many applications launch automatically when Windows starts, contributing to higher CPU usage and slower boot times.
- Task Manager (Startup Tab): Open Task Manager and go to the “Startup” tab.
- Disable: Right-click on any non-essential programs with a high “Impact” and select “Disable.” Only disable programs you are certain you don’t need running immediately.
- Check for Windows Updates
Sometimes, a bug in an older version of Windows can cause high CPU usage. Microsoft regularly releases updates that include bug fixes and performance improvements.
- Windows Update Settings: Go to Settings > Update & Security > Windows Update.
- Check for Updates: Click “Check for updates” and install any available updates.
- Run System File Checker (SFC)
Corrupted system files can lead to various issues, including high CPU usage. The System File Checker tool can scan for and repair these files.
- Open Command Prompt (Admin): Search for “cmd” in the Start menu, right-click on “Command Prompt,” and select “Run as administrator.”
- Run SFC: Type sfc /scannow and press Enter. Let the scan complete. This might take some time.
- Disable Superfetch/SysMain (Use with Caution)
Superfetch (renamed to SysMain in Windows 10/11) is a service that preloads frequently used applications into RAM to speed up their launch. While generally beneficial, it can sometimes cause high CPU usage on certain systems, especially those with HDDs.
- Open Services: Press Windows key + R, type services.msc, and press Enter.
- Locate SysMain: Scroll down and find “SysMain” (or “Superfetch”).
- Disable: Right-click on it, select “Properties,” change “Startup type” to “Disabled,” and click “Stop.” Then click “Apply” and “OK.”
- Note: Disabling this service might slightly increase application load times, but it can resolve CPU spikes in some cases. Re-enable it if you don’t see an improvement or experience worse performance.
- Adjust Virtual Memory (Paging File)
If your computer is constantly swapping data between RAM and the paging file due to insufficient RAM, it can lead to high CPU usage. Adjusting virtual memory can sometimes help.
- System Properties: Press Windows key + Pause Break (or right-click “This PC” > “Properties” > “Advanced system settings”).
- Performance Settings: Under the “Advanced” tab, click “Settings…” in the “Performance” section.
- Virtual Memory: Go to the “Advanced” tab, and under “Virtual memory,” click “Change…”
- Manage Paging File: Uncheck “Automatically manage paging file size for all drives.” Select your C: drive, choose “Custom size,” and set an “Initial size” and “Maximum size” based on your RAM (e.g., 1.5 to 3 times your RAM amount for initial, and 3-4 times for maximum).
- Caution: Incorrectly setting virtual memory can worsen performance. Generally, let Windows manage it unless you suspect it’s the cause of high CPU.
- Check for Software Conflicts
Newly installed software or conflicting applications can sometimes cause high CPU usage.
- Recent Installations: Think about any software you’ve installed recently. Try uninstalling it temporarily to see if the CPU usage returns to normal.
- Safe Mode: Booting into Safe Mode can help determine if a third-party application is causing the issue. In Safe Mode, only essential Windows services and drivers run. If your CPU usage is normal in Safe Mode, a recently installed program is likely the culprit.
- Reset or Reinstall Windows (Last Resort)
If all else fails and you’ve exhausted every other option, a fresh installation or reset of Windows can resolve deep-seated software issues causing persistent high CPU usage.
- Reset this PC: Go to Settings > Update & Security > Recovery > Get started under “Reset this PC.” You can choose to keep your files or remove everything.
- Clean Installation: For the most thorough solution, perform a clean installation of Windows using a USB installation media. Remember to back up all your important data first.
Conclusion
High CPU usage can be frustrating, but by systematically troubleshooting the potential causes, you can often pinpoint and resolve the problem. Start with the simplest solutions like restarting and ending tasks, and gradually move to more advanced steps. With a bit of patience, you’ll have your computer running smoothly again.